Ceiling cracks can be caused by a variety of factors, including moisture, settling of the home, or even minor earthquakes. These cracks can be a real eyesore and can lead to long-term damage if not addressed in a timely manner. So, it is important to determine the underlying cause in order to repair the ceiling crack properly. Let’s look at the various factors that can cause a ceiling to crack.
What causes a ceiling to crack
When ceiling cracks appear on a drywall surface, there are a variety of possible causes. Poor construction is one of them; if drywall is not well-installed, nails and screws that secure the drywall to the framing can loosen over time, causing minor stress fractures in the paper surface of the drywall.
An inexperienced contractor might also use too many screws or nails to secure the drywall to the framing and this can cause the same type of cracking. Improper placement and spacing of screws or nails can also lead to structural weaknesses that cause paint and plaster ceilings to crack.
In addition, using metal framing supports instead of wood may be more likely to cause cracking due to metal’s higher rate of expansion and contraction in relation to temperature changes. Moreover, when attaching fixtures such as speakers or lights, it’s important for whoever is doing work on your ceiling surfaces to use a proper anchor designed for specific applications; otherwise, too much weight may be applied directly through an unsupported hole in the ceiling that leads once again to cracking issues.
Poor installation of drywall
Poor installation of drywall can be one of the common causes for ceiling cracking or plasterboard joints or cracks. Poor workmanship, not enough screws, and a lack of full support for framing can all cause sheeting or plasterboard joints to crack. When dry wall sheets are not held tightly together and screws are not properly installed it may cause cracking; in order to repair these areas you may need to remove part of the wall area and reattach the drywall making sure that all screws are securely fastened.
It is also important to note that all framing should have adequate support before attaching any drywall, insulation, or other material. Installing more than one layer on the existing framework without proper linear bracing and reinforcement can potentially stretch out the framework and produce undesirable surface cracking. If this is found to be the case then replacing combustible parts with noncombustible parts such as steel might be necessary. Furthermore, checking if anything is blocking the operation of fire damper could create excessive pressure along seams over time leading to crack formation at joints due to excessive movement in piping systems located inside walls and ceilings.
Poor ventilation
Poor ventilation can manifest in the form of ceiling cracks. Air should be able to circulate freely around the edges of your room, including through vents and windows, in order to keep humidity levels low. When rooms don’t have adequate ventilation, moisture builds up inside and puts pressure on the ceiling structure. This pressure eventually causes the drywall and paint to crack. If you experience frequent or severe ceiling cracks, it may be a sign that you need to improve your home’s ventilation – or better yet have an expert inspect your home for any air leaks that may be compromising its integrity.
Poor insulation
There are a number of issues that can cause ceiling cracks that go beyond the surface. Poor insulation, inadequate ventilation and roof structure problems are at the top of that list. Improperly insulated walls, lack of insulation in attics, roofs or melted snow and ice on the roof can all create weak points in structural support and lead to ceiling cracks.
If your home is not properly insulated it is likely that temperature changes throughout the house during winter and summer months will cause weak spots to appear in ceilings as warm air rises to the upper levels while cold air sinks to lower levels creating a pressure differential. This pressure differential will place significant stress on ceilings causing them to crack. To reduce this issue, it’s important to maintain proper insulation throughout the house.
Inadequate ventilation will also have an effect on ceiling cracking as well as damage them directly by allowing moisture build up in attic and other areas not exposed directly the sun’s light or outside temperatures where fungi or other organisms may grow unchecked leading to weakened panel surfaces beneath or beyond visual range but with potentially catastrophic implications for strength of panel construction integrity once discovered over time due to physical load stresses from above . If too much water vapor accumulates this could significantly weaken drywall ceilings panels leading eventual collapse become more likely from even daily movements indoors like those experienced when walking just under panels but undetected until visible sign notices when stronger movements, such as thumping noise heard overhead happens to the home’s occupants. Proper ventilation should therefore be maintained when expecting any dampening impairment conditions inside home near walls or ceilings..
Finally, an improperly designed roof structure without adequate beam reinforcement could allow stress points develop causing surface tension hold between beams which support building weight become too much widened caused large scale damage entire structure having into account specific influences climate location (temperature extremes cold winter days warm summer nights) local region locally materials used construction projects during renovations may contribute different problem reason mentioned previously
Age
Age is the most common cause of ceiling cracks. Taken from a technical standpoint, any ceiling that is more than 10 years old and was constructed before 1980 has an increased potential for crack formation. This time frame is due to major changes that occurred in the way houses are built as well as the fact that recommended standards for house construction were not followed by many builders or homeowners. The factors which can contribute to age-related cracks include problems with settling foundations, framing members deteriorating due to moisture, wood shrinking or expanding seasonally and poor craftsmanship during initial construction. In addition, forces created by wind or ground movement can lead to bulky sections of drywall strain which induce cracking in ceilings – especially when no trusses are present to transfer the force load. Finally, rusting of wall ties (which help secure walls to each other) may cause upper walls to exert lateral pressure on a ceiling and create ceiling cracks.
Preparing for Repair
If your ceiling is exhibiting signs of damage, it’s important to take the time to do a thorough investigation to identify what is causing the problem. Common causes of ceiling cracks include water damage, shifting foundation, or inadequate support for an upper level of the home. Taking the time to identify the cause of the crack will help ensure that any repairs you do are effective and that you don’t need to make any further repairs in the future. In this section, we will discuss the steps to take when preparing for ceiling crack repair.
Inspect the crack
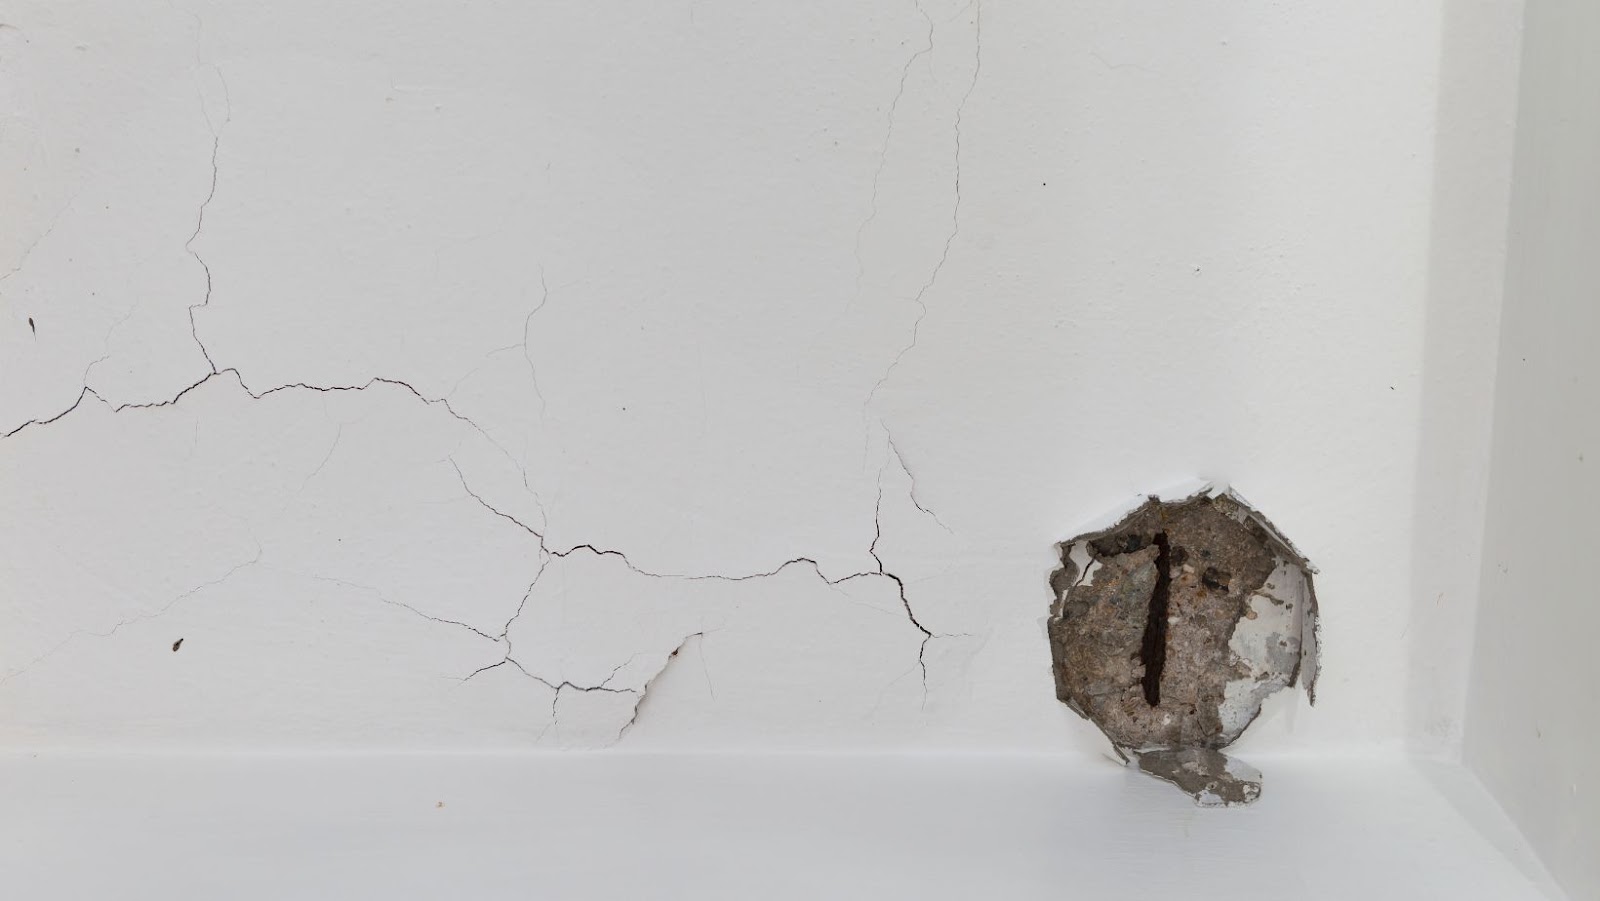
Inspecting the ceiling crack is a critical step to understand the extent of repair work you need to undertake. Start by identifying the type and size of crack – is it a hairline crack or a wide gap? If it’s a long crack, measure its length and check if it has split or jagged edges or if they’re smooth. If there’s an inherent structural issue causing the problem, patching and filling up the gap might only provide a temporary fix. Also, look for wet patches around the crack that could indicate water seepage problems. Once you have completed the inspection process, you can begin preparing for repair work.
Remove any dust or debris
Before you can begin the repair process, you need to make sure the area is clean and free of dust and debris. This applies to both the crack itself, as well as the surrounding area that may be impacted by your repair work. You can use a vacuum cleaner with a crevice tool or an old paintbrush to gently remove any built-up dirt or dust in and around the crack. You also want to wipe away any cobwebs, dead bugs, or other unwanted materials that may have accumulated in or near the crack. Doing so will help ensure that your repairs are clean and effective.
Once you have removed all dust and debris from the area, next inspect the walls for damage adjacent to the crack. Cracks may appear from a more serious problem such as water damage or structural shifting of your walls – inspect carefully for any signs of these additional elements before proceeding with your project.
Apply a patching compound
When providing ceiling crack repairs, it is essential to use several different products and procedures. To start with, you need to apply a patching compound over the crack. Patching compounds are a combination of paint, filler and texture that are used to fill in and seal surface imperfections in drywall. There are several types of patching compounds available; be sure to choose one that matches the texture of your existing wall or ceiling surface.
Before applying the patching compound, prepare the area by thoroughly cleaning and drying it. Be sure to remove any dust or dirt particles that could interfere with adhesion. Once you’ve completed this step, use a putty knife or spreader to apply a generous layer of patching compound directly over the crack. It is possible for some minor cracks to be sealed without using any further material; however, deeper or wider cracks may require additional layers of compound before painting it smooth. Allow enough time for each layer of material to dry before applying additional layers or sanding down your repair work.
Allow the compound to dry
Before beginning the repair process it is important to allow the compound to completely dry. Depending on climate, environmental conditions, and type of plaster used, the drying time may vary. If the compound has been applied too thickly it may take up to a couple of days for it to completely dry. Using a fan or dehumidifier during this time can help speed up the drying process.
Once dry, lightly sand the area so that you have a smooth transition for your new coat of plaster. Make sure not to apply too much pressure when sanding as this could create additional divots which will need another layer of mud and more drying time before continuing on with repair. Always wear a dust mask when sanding surfaces inside your home as micro-particles from sanding can float around in air and cause health hazards if breathed in. Now that you have prepped the area you can now cover with a second layer of mud using one or two coats depending on your repair needs. Smooth out any areas with angerl or trowel until you get desired finish looking even with adjoining walls/surface around area being repaired.
Repairing the Crack
Repairing a crack in the ceiling can be an intimidating endeavor, but with the right approach, it can be manageable. Knowing what causes a ceiling to crack is the key to understanding how to address the issue. Ceiling cracks can be caused by a variety of things, including structural problems, moisture issues, or simply age. Understanding the source of the crack is essential in determining the best course of action for repair.
Apply a thin layer of joint compound
Applying a thin layer of joint compound over the crack is an important step in the ceiling repair process. Begin by using a putty knife to spread a thin layer of joint compound over the crack, beginning at one end and working towards the other. Make sure that you keep your putty knife at a low angle and apply it in an even layer; this will help ensure that the repair looks as uniform as possible.
After you finish applying the thin layer of joint compound with your putty knife, you can use sandpaper to gently smooth out any bumps or ridges left behind by your putty knife strokes, then vacuum away any dust or debris left behind. Take care to only apply enough pressure to smooth out any ridges without putting too much strain on the newly applied joint compound.
Once satisfied with your smoothing job, allow for at least 24 hours for the joint compound to fully dry before continuing with further repairs and painting.
Smooth the joint compound with a putty knife
Once the joint compound has been applied, you will need to smooth it out with a putty knife. You may use a four-inch or six-inch metal putty knife or a taping knife for this step, depending on the size of your crack. Start near the edge of the crack and carefully drag the blade across it in long smooth strokes, stepping back and inspecting your work periodically to ensure an even finish. Continue in this manner until you have covered the entire area. Once you are finished, remove any excess joint compound that might be hanging over the edges of the crack. Allow the area to fully dry before proceeding with painting or other finishing touches; drying time may vary from several hours to overnight, depending on factors such as temperature and humidity.
Allow the joint compound to dry
Once the wall has been patched with the joint compound, be sure to allow it to dry completely. Depending on the humidity level in your house, this could take anywhere from two to five hours. When the joint compound is completely dry and hardened, use a fine-grade sandpaper or sanding sponge to gently smoothen out any bumps or ridges that remain. Once finished, gently brush away any dust particles from the area with a clean cloth.
Finishing the Repair
Once the cause of the crack in the ceiling is identified, it’s time to start the repair process. Before beginning, you’ll want to make sure you have all the tools you need to complete the job, such as joint compound, a putty knife, sandpaper, a drywall saw, and a patching material. Now that you have all the supplies, you’re ready to begin the repair process.
Apply a second layer of joint compound
Once the first layer of joint compound has been applied over the crack and allowed to dry, you will need to apply a second layer. This layer should be twice as thick as the first layer, and for best results it should be applied with a six-inch drywall knife. As before, spread the joint compound across the crack in a smooth and flowing movement, then use the knife to smooth out any ridges or bumps.
If additional layering is desired for a stronger bond, you may apply up to three total layers of joint compound. After each additional coat allow at least twenty-four hours drying time before sanding it down and beginning another layer. Smoothness is key in achieving undetectable repair; take care to evenly spread the tool or brush across all edges of replacement surfaces or repaired areas prior to allowing them to dry.
Sand the area smooth
Once the drywall compound or mudding has fully dried, it is time to begin sanding the area. This should be done to remove any excess material that is still visible and to begin feathering the edges of the repair area so that it will blend better when you paint or texture the ceiling. You should use an 80-100 grit sandpaper for this process — anything much finer can clog up too quickly and make it difficult to get a really smooth finish on your ceiling.
Use light, even strokes and do not exert too much pressure, as you may damage the repaired patch with a more aggressive approach. Once you have finished sanding, use a vacuum cleaner with an attachment designed for floor surfaces to thoroughly clean up all of the residual dust particles left behind by your sanding efforts.
Your next step is to apply a thin layer of spackle compound over top of the repair site once again using either your putty knife or taping knife, depending on what works best in your situation. Once this has been applied allow enough drying time before going back over it once again with some light sandpaper just as before. Finally, you can inspect your repair job and make final touch-up details as needed before painting or texturing according to how you want your ceiling finished off!
Apply a coat of paint to the area
Once the crack has been repaired, the area should be primed with a good quality sealer or primer and sealed with Caulk. Once this has dried, a coat of paint should be applied. Use a roller and painting pole to apply your chosen paint. Start at the crack area and work your way outwards in even strokes to cover the whole repair. If necessary, use a brush to get into any corners or points where the roller might not fit. Remember to use gentle pressure so as not to damage your repair job. Allow paint to dry fully between each coat of painting until you’re pleased with its appearance. Be sure to allow full drying time before allowing anyone in contact with the repair area, particularly children or pets.
Allow the paint to dry
Once all the materials are applied, they must be allowed to thoroughly dry before proceeding any further. To ensure that the repaired area is sufficiently dry, allow at least 24 hours after applying the last layer of compound. Keep any pets or children away from the repaired area and do not touch or tinker with anything until it is completely dry. Different conditions still require different drying times, so if possible use a fan to help speed up the process.
In order to determine when the material is completely dry, use a damp cloth and lightly press down onto the repair. If no residue remains on your rag then it is ready! It’s now time to move onto painting over the repair for a seamless finish. When painting over repairs in ceilings, sponging techniques are often used for a better finish. This involves sponging a coat of primer over and around the patch, blotting off some of it with rags soaked in water and blotting off more as desired with additional colors for Variation and special effects.
Preventing Future Cracks
Cracks in your ceiling can be unsightly, and can potentially lead to serious structural damage and costly repairs. To prevent future cracks from forming, it’s important to understand the main causes of ceiling cracking, such as issues related to humidity, temperature, and foundation settling. Let’s explore some tips and tricks that can help you improve the stability of your ceilings and prevent further cracking.
Ensure proper ventilation
Ensuring proper ventilation of the foundation is a key component in preventing future cracks. This involves keeping air moving through the crawlspace or basement and avoiding the build-up of moisture, which can cause mold growth, dry rot and mildew. To ensure proper ventilation, inspect windows, doors and vents for any potential blockages, or consider professional installation of a continuous mechanical fan system to keep air moving. Additionally, make sure to check areas where plumbing or electrical wires come into contact with soil because insulation around them can trap moisture.
Sealing small cracks around doors and windows with caulk can help reduce air circulation that could contribute to poor ventilation as well. Another option is to install covers over vents with mesh screens to filter incoming air before it enters your home – this can prevent both pests and too much humidity from entering the space while allowing airflow. Ultimately, it’s important to keep your space well ventilated in order to limit opportunities for future foundation damage caused by trapped moisture against your walls and flooring.
Install adequate insulation
One of the best ways to avoid ceiling cracks in the future is to install adequate insulation and ventilation. This will help regulate temperature fluctuations in your home, which can cause drywall expansion and contraction and lead to cracking. Insulation helps keep other parts of your house cooler, minimizing pressure on ceilings that come from rooms where there is a lot of activity or appliances like ovens and fireplaces that generate heat. Moreover, by maintaining consistent temperatures in your home, you can limit seasonal humidity-related damage.
Additionally, be sure to monitor your HVAC system for any problems that could cause fluctuating temperatures (filters need to be changed regularly) or too much pressure build-up inside your house that could lead to additional ceiling cracking. Installing proper insulation in attic and roof lines can cut down on moisture accumulation and reduce the amount of hot air leaving through the roof in summer months. Insulation also helps keep cold air outside during winter months, reducing temperature fluctuations throughout your entire home for stability year round.
Check for signs of moisture damage
When inspecting your ceiling for existing cracks, be sure to look out for signs of moisture damage as well. High levels of humidity can cause paint to bubble, plaster to crack and metals to corrode. This can weaken the structural integrity of your ceiling and lead to more serious problems down the road.
To check for moisture damage, look on both the front side and backside of your ceiling. Pay particular attention to any areas with persistent condensation that remain damp even when it’s not raining or snowing outside. Also keep an eye out for discolored stains around windows that may indicate a leaky roof or a plumbing issue inside the walls. It’s best to address this issue immediately before it has a chance to spread further into your ceiling material.
Finally, take some time to inspect the insulation inside the walls near your ceiling cracks as well as any nearby air ducts. Exposed air ducts can draw in humid air from outside, leading to condensation on colder surfaces such as metal pipes and wood framing material. As a preventative measure, you may need to increase insulation in these areas in order insure proper thermal regulation throughout the home and reduce future moisture issues down the road.
Regularly inspect ceilings for signs of cracking
Regularly inspecting your ceiling for cracks or signs of damage is important in order to prevent any further harm. Make sure to take a few moments each month to examine your ceilings for any new cracking, discoloration, or exposed beams that could be signs of structural issues in the future. Pay special attention to any area of the ceiling where there was water damage or other structural issues in the past, as this can be an area at risk for additional damage over time. Additionally, look for any indicating signs of moisture such as mold or mildew that could be related to a leaky roof or plumbing issue.
Be sure to look closely at all internal and external walls and check around windows and door framing for signs of cracking due to structural shifting. The surfaces around these points can become weak over time and even if they seem stable now, they might need attention later on down the line. It’s better to catch the issue before it has time to worsen than wait until it has caused significant damage that will cost a lot more money to repair. Taking preemptive measures now will save you time and money in the long run.